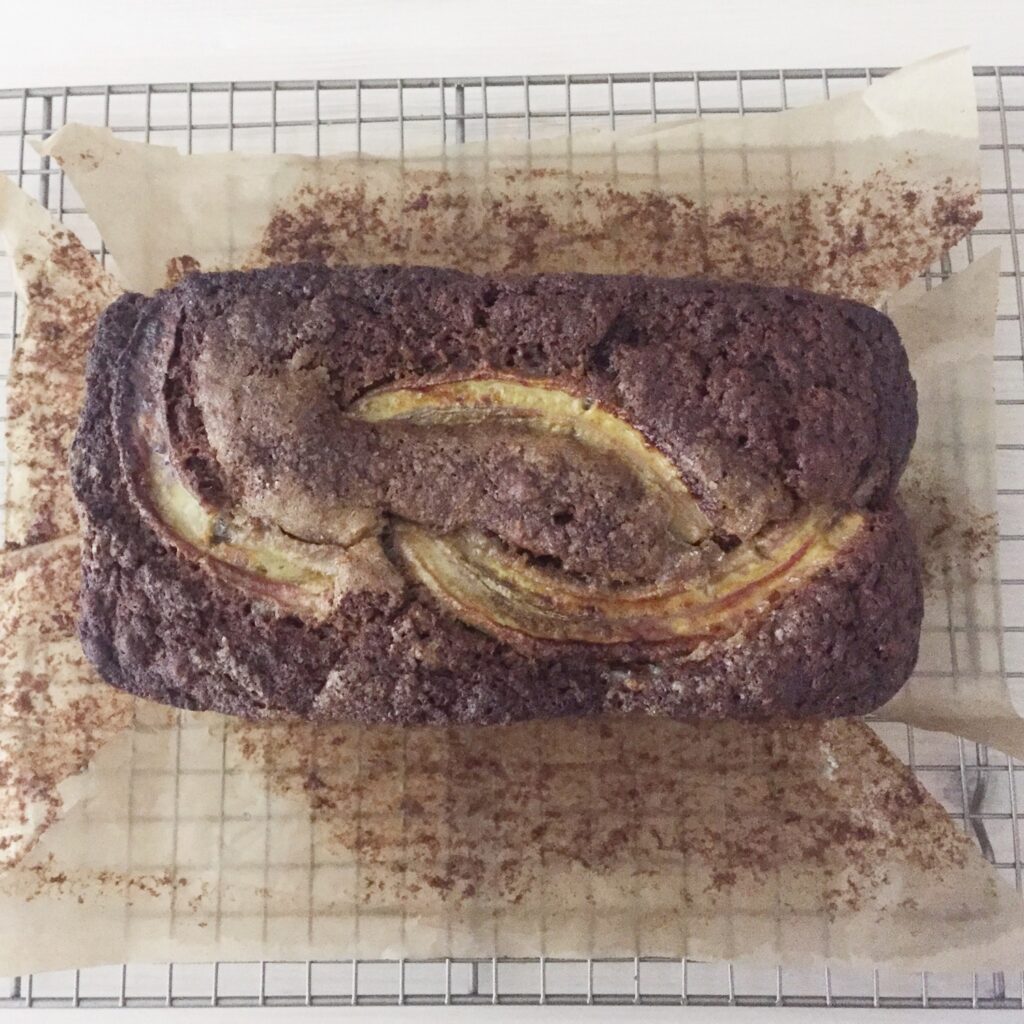
banana bread – perfect to freeze for lunchboxes
When I posted a picture of this banana bread on social media this weekend I received a bonkers amount of comments. Loads of you sent me recipes for your favourite banana bread recipes. It seems I’m not the only one who is on a quest to find The One when it comes to banana bread. I’ve spent years trying a new recipe every time the bananas in my fruit bowl start to get beyond the stage anyone will eat them.
This recipe isn’t just a winner in terms of flavour, it uses minimal equipment and is easy enough for children to make with very little help.
Homemade banana bread is always better than shop bought
Banana bread is one of those things that sounds really healthy. I’ve tried all sorts of lower sugar, lower fat recipes but this is so much better. And as far as I see it (and I hope you do too), a homemade cake is healthier than a supermarket gluten-free or low fat cake. Some recipes massively cut the sugar and use all sorts of things to make the cakes low fat, low sugar or gluten free, but this is more traditional, simple and delicious. And I’ve come to a stage where I’d rather have a slice of this once or twice a week than a slice of one of the uber healthy ones each day.
Banana bread freezes brilliantly
Freezing banana bread acts as a good way to stop those of us with poor willpower (me) from eating a slice every time we pass the cake tin. Just wait for it to cool and slice it. Wrap the slices in parchment or foil and then freeze them. Grab one out in the morning, throw it in your bag or lunchbox and it will be defrosted by lunchtime. They can be toasted from frozen under the grill (broiler). I’ll leave it up to you up you butter it with some salty butter (I would).
A few notes on ingredients and measuring
All the liquids in the recipe can be weighed. So you won’t need to dirty a bunch of measuring cups or jugs. And you’ll be more accurate. Just set the bowl on your digital scales and press zero before adding each ingredient to the other ingredients.
I usually make this with frozen bananas that I’ve defrosted. It is rare I get 6 overripe bananas at one time to I’ll just peel the odd one as it gets too ripe and freeze it whole. Then I can just grab them out for smoothies (use from frozen) or let them defrost at room temp for an hour before making this cake.
If you don’t bake regularly, be sure to check that your baking powder and bicarb (baking soda) are in date. If they aren’t you won’t get the required rise to your cake.
Where I live in Cheshire we’re surrounded by rapeseed fields so I use a local rapeseed oil. The lovely thing about rapeseed is that the plants not only produce this heart and brain friendly oil (which is lower in saturated fat than olive oil and can be used at high temperatures), but the flowers encourage bees. Rapeseed is known as canola oil in the US.
This cake is made in a 1 litre (2lb) loaf tin but I’ve also made it in a shallower brownie tin – just cut the cooking time by about a third if you’re making it in a shallower, wider tin. Not sure what size your tin is? Just fill a measuring jug with 1 litre water and pour it into the tin.
To make your banana bread
- 5-6 medium sized very ripe bananas – the skin should be pretty brown
- 150g (just under three quarters of a cup) rapeseed or mild olive oil (in the US rapeseed is sold as canola – see note above)
- 150g (three quarters of a cup) dark brown sugar
- 1 teaspoon vanilla extract
- 2 large eggs
- 75g (a third of a cup) plain full fat yoghurt
- 210g (1 and three quarter cups) wholewheat plain (all purpose) or wholewheat spelt flour
- 1 teaspoon baking powder
- 1 teaspoon bicarbonate of soda (baking soda)
- 1 teaspoon fine grain sea salt
To make:
- Preheat the oven to 180°C (350°F) or, if you have a fan or convection oven use 160°C (310°F).
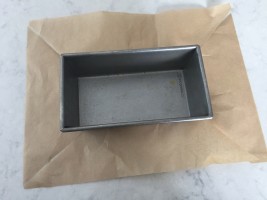
- Use parchment to line a 23 x 12cm (9 by 5 inch) loaf pan. If you want your cake to be shallower you can use a 23cm (9 inch) square tin that is at least 5cm (2 inches) deep. I line my pan by putting it on the parchment then cutting a diagonal to each corner. Then I put the paper inside and press it into place. You don’t need to rub the parchment with oil or butter.

- Put your flour, salt, baking powder and bicarbonate of soda (baking soda) into a large bowl. Use a hand whisk to mix it all together.
- In a separate bowl, peel your bananas (hold one back to decorate with) and mash them to a pulp. I use a potato masher but you could use a fork. This is an excellent job for small children.
- Once the bananas are mashed, add the eggs and whisk them in as well as you can. Then set the bowl (with the bananas and eggs still in it) on your scale, zero the scale and add your your oil, yoghurt and sugar. Zero the scales after each ingredient is added before you weigh the next one. Add your vanilla. Whisk these wet ingredients together until they are just combined.
- Pour the dry ingredients into the wet ingredients and whisk together until they are just combined – over mixing will give you a tough cake.
- Use a silicone spatula to scrape the batter into your prepared tin. Give the tin a shake so that the mixture flows evenly into the corners then use a sharp knife to slice your remaining banana into three long strips. Lay the strips on top of the cake (see photo) before sitting the loaf tin on a baking tray and putting it in the oven – this means any overspill is easier to clean up.
- Ovens vary but I cook mine for 60-75 minutes in a loaf tin or 45-55 minutes in a square tin.
- Check yours 10 minutes before the end of the cooking time by putting a metal skewer into the middle of the cake. If there is any mixture sticking to the skewer, put the cake back into the oven and check it every 5 minutes until the skewer comes out clean. Your cake should be a dark golden brown on top.
- Once your cake is ready, take the tin out of the oven and leave the cake to cool in the tin for 30 minutes before lifting it out and leaving it to cool on a rack for about half an hour.
- Keep leftover cake, wrapped in parchment in a cake tin. There is no need to put it in the fridge. I believe it will keep for about 5 days but mine has never lasted that long! You can also cut your cake in half, or into individual servings and freeze it, wrapped in foil, for another day.
Equipment
You can now buy the equipment I use in this recipe through my shop. I’ve spent years testing my favourite bits of equipment so rest-assured that whatever I recommend is the best tool for the job and will give you great results without cluttering your kitchen with unused tools. I receive a small affiliate fee from Amazon if you buy via my link. The products don’t cost you any more. These small fees help me keep creating all the free content I share.
Get more recipes like this
Find more recipes for bananas, flour, baking and sweet things and packed lunches here.
Sign up for more
Sign up for my free newsletter. You’ll get free seasonal recipes, tips and videos. You’ll also be first to hear about my online and in person courses.
I agree to be emailed about your products and services
